Stargazing is a wonderful pursuit that appeals to both the casual and dedicated observer, but views outside of cities are often much clearer and brighter thanks to different levels of light pollution.
Excessive and misdirected use of artificial light is more common in cities and can have a huge effect on the visibility of the night sky, particularly for those stargazers who are looking to observe faint deep sky objects with some of the best telescopes.
With the urban glow of light pollution still a huge problem for night-sky observation, there often seems to be limited solutions for getting wonderful views of galaxies and star clusters from the bright light of the cities. The best smart telescopes offer a powerful remedy to this problem in the form of advanced image stacking and real-time processing to filter out artificial light interference and reveal detail in objects that would be difficult to observe with the naked eye or traditional optics.
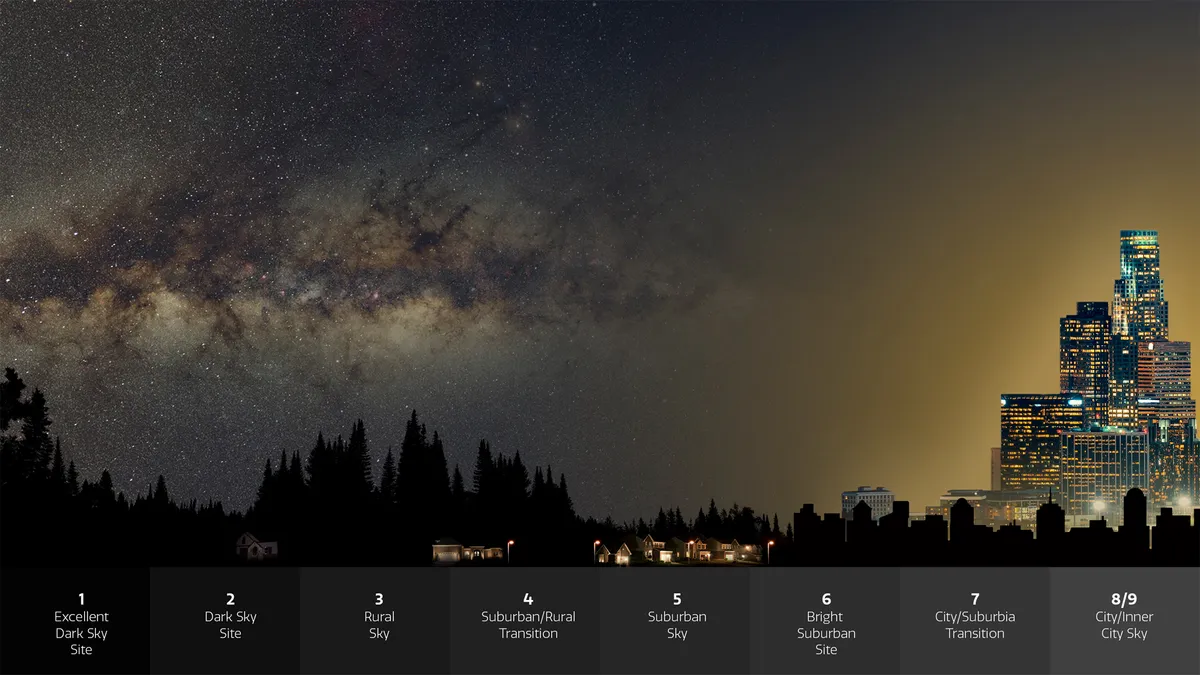
The Bortle scale is a numerical scale that ranges from one to nine, with one being an excellent dark sky site with no light pollution and nine being an area with considerable light pollution and many night sky objects invisible to the naked eye. Here are all the things I saw with a Unistellar Odyssey Pro smart telescope from Bath, U.K., which measures a seven or eight on the Bortle scale.
Nebulas

During an imaging session where I set the telescope up on the balcony, the Odyssey Pro managed to cut through the haze and reveal a stunning object: the Western Veil Nebula (Caldwell 34). Located in the constellation Cygnus, the Western Veil Nebula is part of a larger structure, an expansive supernova remnant called the Cygnus Loop.
I actually left the telescope trained on the nebula with “Enhanced Vision” on and left it for 45 minutes. Thanks to advanced image processing and stacking, the nebula’s wispy filament of dust appears red and blue next to star 52 Cygni.
Image 1 of 2


Planetary nebulas are easy to catch but are usually quite small compared to diffuse nebulas and supernova remnants. We managed to capture the famous Ring nebula (M57) and the Blue Snowball Nebula (Caldwell 22).
Planetary nebulas do not have anything to do with planets and are actually the result of a star in its final stages of life. The outer layers are shed as it transitions into a white dwarf, then the remaining core illuminates the expanding gas shell. Early observations of these nebulas were described as resembling planets.
Star clusters

Star clusters are some of the most rewarding objects to observe, and the smart telescope did not disappoint. Leaving the Odyssey Pro trained on the Great Pegasus globular cluster (M15) for six minutes allowed it to stack multiple frames, resolving a glittering blue ball of stars.
Image 1 of 2


Best for versatility

The Unistellar Odyssey Pro is a great smart telescope that gives great lunar, planetary and deep space views. It also features a Nikon eyepiece for a more traditional viewing experience and is light enough to carry to remote dark sky sites.
★★★★½
I also captured M10 in Ophiucus and the Hercules globular cluster (M13) but I used a shorter time on the enhanced vision mode. Whilst it isn’t essential to use enhanced vision to see deep sky objects, it does help in areas with strong light pollution. The telescope takes multiple exposures of four seconds each and gradually builds up a stronger image of the target object, meaning that the longer you leave it, the more detailed the image is. For objects like star clusters, a longer imaging time gives you the chance to resolve fainter stars. This also gives the telescope a chance to process the stacked images to remove some of the interference from light pollution and atmospheric disturbance.

Open star clusters can also be observed with a smart telescope. I spent 10 minutes imaging NGC 6940 in Vulpecula and got this beautiful wide view of scattered stars. Open star clusters are loose and irregular groups of stars that are often younger and contain fewer stars when compared to denser globular clusters.
Stars

Best for sensor resolution

The Vaonis Vespera Pro is the best smart telescope for sensor resolution, with a huge 12.5MP sensor, which is great for expansive nebulas or star fields. It makes astrophotography simple with the intuitive Singularity app and is super simple to set up. There is also the option to get specific filters for light pollution or dual-band imaging.
★★★★
When using powerful optics and modern technology, it can be easy to get carried away looking for deep sky objects that often take upwards of 20 minutes to get the best detail. Stars are easily resolved within seconds and an enhanced vision time of two minutes is more than enough to show their brilliance.
Some of the brightest stars in our sky look great when imaged with a smart telescope. Vega in the constellation Lyra is the fifth brightest star in the night sky and shines blue thanks to its extremely high surface temperature. Compare that to the fourth brightest star in the night sky, Arcturus, which is a red giant star and appears as a distinct orange-red color because it is much cooler and older than Vega.
Image 1 of 2


Minor stars are also a wonder to observe, with many of them easily resolved with a couple of minutes spent in enhanced vision mode. I observed the star Tarazed in Aquila, which forms the trio of stars that represent the head and shoulders of the ‘Eagle’ with the brighter Altair and fainter Alshain. A smart telescope is a great tool to learn more about the hidden gems and less-well-known targets in the night sky.
Thanks to the Unistellar sky catalog on the Unistellar app, there is a pre-generated list of objects that are observable in your location and sky area. This can help with knowing what objects are immediately observable in your area. This is not always fully reliable as it doesn’t account for trees or buildings that can obstruct your view. I found that in city areas packed with buildings and trees, it was useful to use one of the best stargazing apps to see what objects I could potentially see without the telescope before slewing. While the “visible sky area” suggestions in the Unistellar app are a good way to get observing immediately, don’t let it restrict you from other objects that you might be able to see.
Galaxies

The sky is full of galaxies and while they are faint and often invisible to the naked eye, a smart telescope with smart stacking makes light work of observing some very interesting characters in the cosmos.
Some resolve easier than others and galaxies are amongst some of the trickiest to photograph when you are trying to get detailed dust lanes and spiral arms. You can just about make out the outer spiral arms of the Triangulum Galaxy (M33), which appeared blue when enhanced vision was used for five minutes. A longer exposure would definitely have strengthened the structure of the galaxy but for five minutes in a light-polluted area, I think this is a great result.
While not the most detailed photograph of the Andromeda Galaxy (M31), the Odyssey Pro sure helped with observation of our nearest large galaxy outside of the Milky Way. I used enhanced vision for over an hour and you can see small semblances of dust lanes starting to develop but still very far away from the iconic images of M31 that everyone knows.

Best budget smart telescope

If you are on a budget, you would be hard-pressed to find a better value smart telescope than the ZWO Seestar S50. The build is solid and is incredibly portable compared to models from other brands. It comes with built-in light pollution filters and produces impressive photos of deep space objects like galaxies and nebulas.
★★★★½
Like with all of the other types of deep space objects, it is also good to see the rare and lesser-known galaxies which are cast about the sky. The portion of the sky that was visible to me from my balcony and wasn’t blocked by trees contained the constellation Pegasus.
I did a quick search for galaxies in Pegasus and quickly found them in Unistellar’s sky catalog. Two standouts from this session were NGC 7331, a galaxy sometimes called the Milky Way’s twin due to its similar structure, and the S-shaped galaxy NGC 7479. Whilst relatively small on the photograph, the Odyssey Pro did well at resolving details that stand out.
Image 1 of 2


Depending on the field of view of your smart telescope, some users may find that some galaxies appear too small for their astrophotography goals and it often seems that when using enhanced vision, these galaxies reach a peak at around 20-30 minutes.
The moon and the planets

Unistellar’s enhanced vision uses different algorithms for different targets to get the best observation results. Planetary and lunar observations are made up of a series of rapid exposures that are discarded if blurry or disturbed, with only the best frames being used to make up the image you are seeing.
Whilst the moon might not be that hard to see in a light-polluted area, capturing it on a smart telescope is still impressive. Capturing the moon in any phase on a smart telescope makes identifying lunar features super easy and if you are lucky enough to live somewhere with an abundance of clear skies, a smart telescope makes it easy to get a detailed shot of every phase of the moon as it progresses through the month.

Another great observation I made with the Odyssey Pro was Saturn. Yes, it is quite low-resolution but how cool is it to see the iconic planet and its rings from a city sky? If you are after a telescope to get better images of Saturn and our other solar system neighbors, check out our guide to the best telescopes for seeing planets.
Tips to make the most of your observation

- Use a stargazing app
- Be open-minded about which observation targets you choose
- Let your telescope thermalize for 30 minutes before observing
To make the most out of stargazing in a city with a smart telescope, there are some important things to remember. As your visible sky area may be limited by buildings and trees in a city center locality, make sure to use a stargazing app to work out what targets you will actually be able to see. Some smart telescope apps like Unistellar also have a tag on their catalog that you can select to only show you things you can see in a certain location.
You should try to be open-minded with observation targets when observing from a city. You might not be able to see one of your favorite deep-sky targets from your location but there will be plenty of objects in your restricted visible sky area. It gives you a chance to see less well-known targets that you may not have seen otherwise.
Before starting any serious observations or astrophotography, you should let the telescope thermalize for 30 minutes beforehand. Thermalizing is the process of allowing the telescope and its components to reach the same temperature as the space where you will be observing. This process is much more important during winter observations but it is a good habit for any telescope user. Allowing the telescope to reach the same temperature as the observation location prevents thermal distortion and improves image focus.
Source link