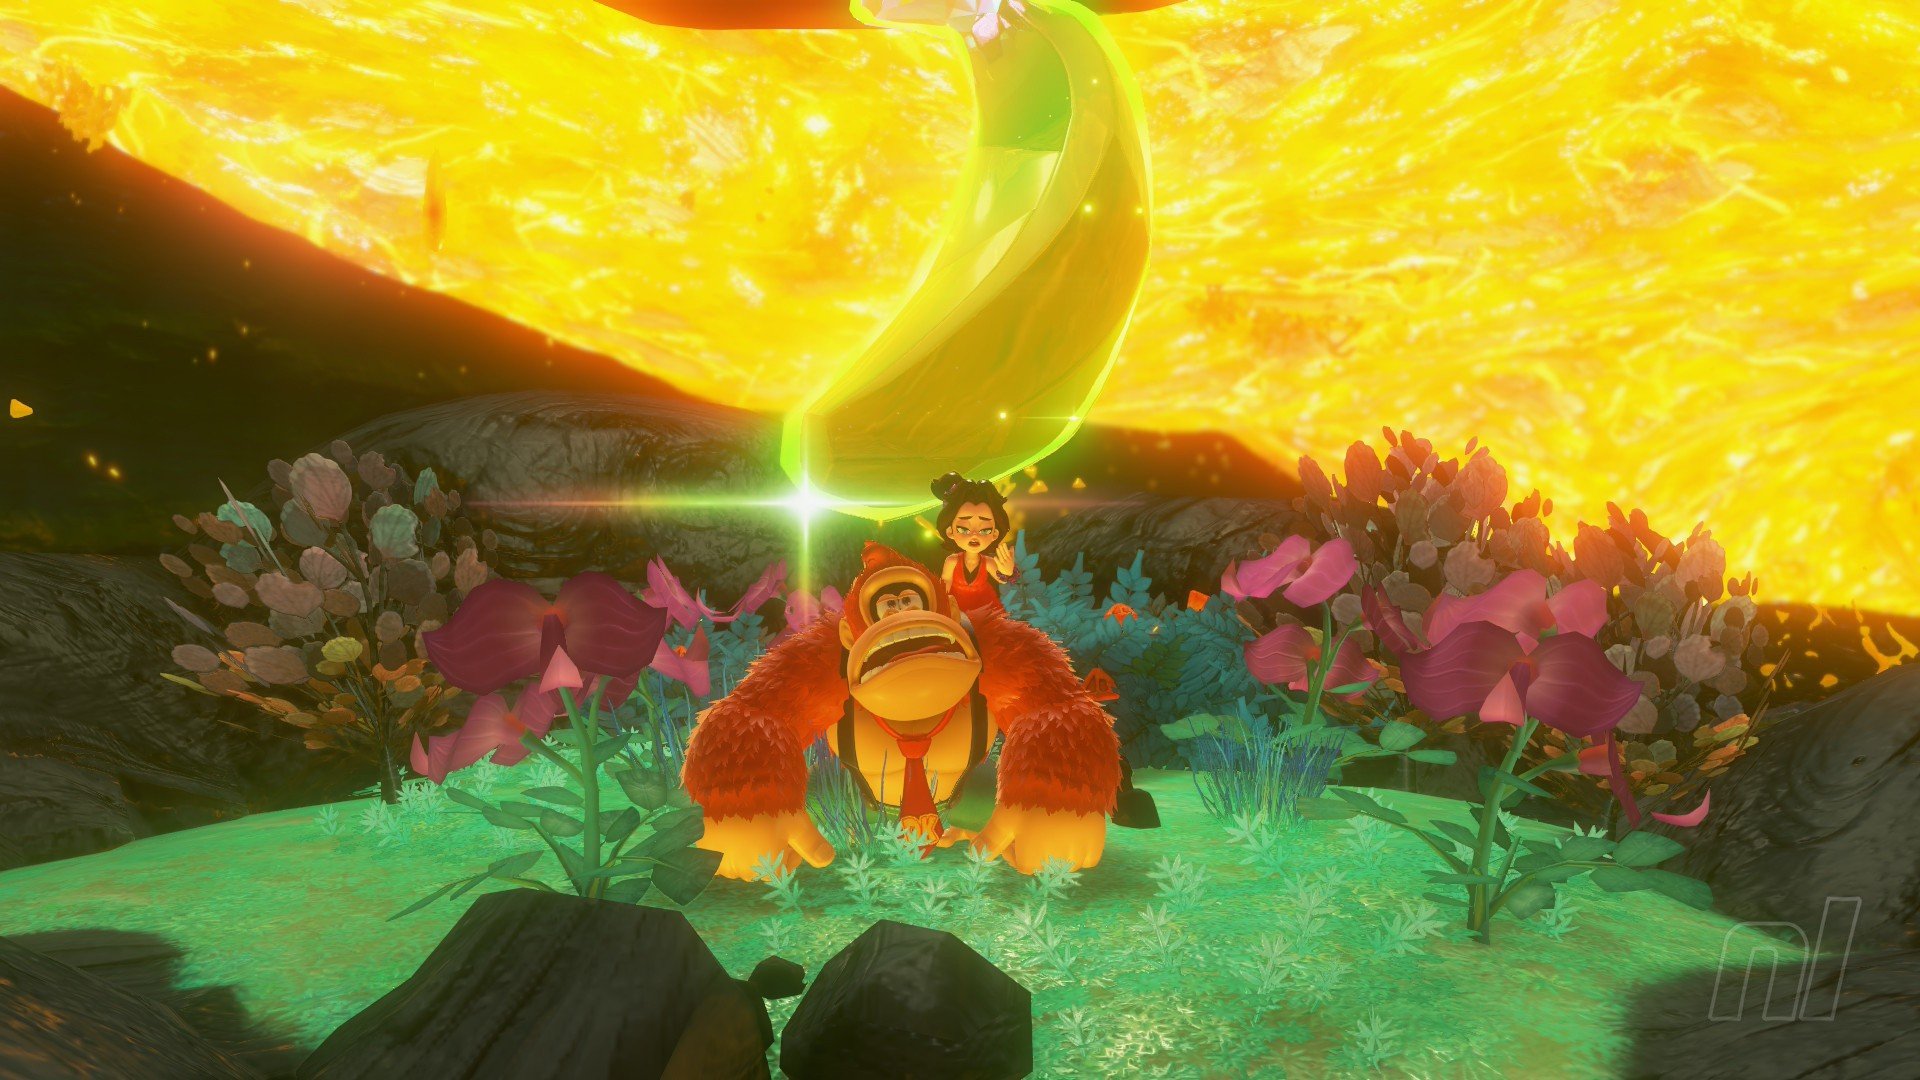
We’re heading to the rainy Tempest Layer for this Donkey Kong Bananza Banandium Gem guide — we hope you packed your brolly!
Below, we have laid out maps and lists with detailed instructions for how to nab the 70 Banandium Gems in the Tempest Layer across its three sub-levels (don’t worry, there aren’t any Gems to be found on SL903).
If you are tracking down collectibles on other layers, be sure to check out our full Banandium Gem Locations guide hub for a similar shakedown of the other regions.
Tempest Layer Banandium Gem Locations
You’ll find all Banandium Gems for the Tempest Layer below, broken into their respective sub-layers. There’s also a batch of bananas in this region that you can only pick up after you’ve rolled credits, and we’ll be adding details of those to their own section in the guide in the coming days.
SL900
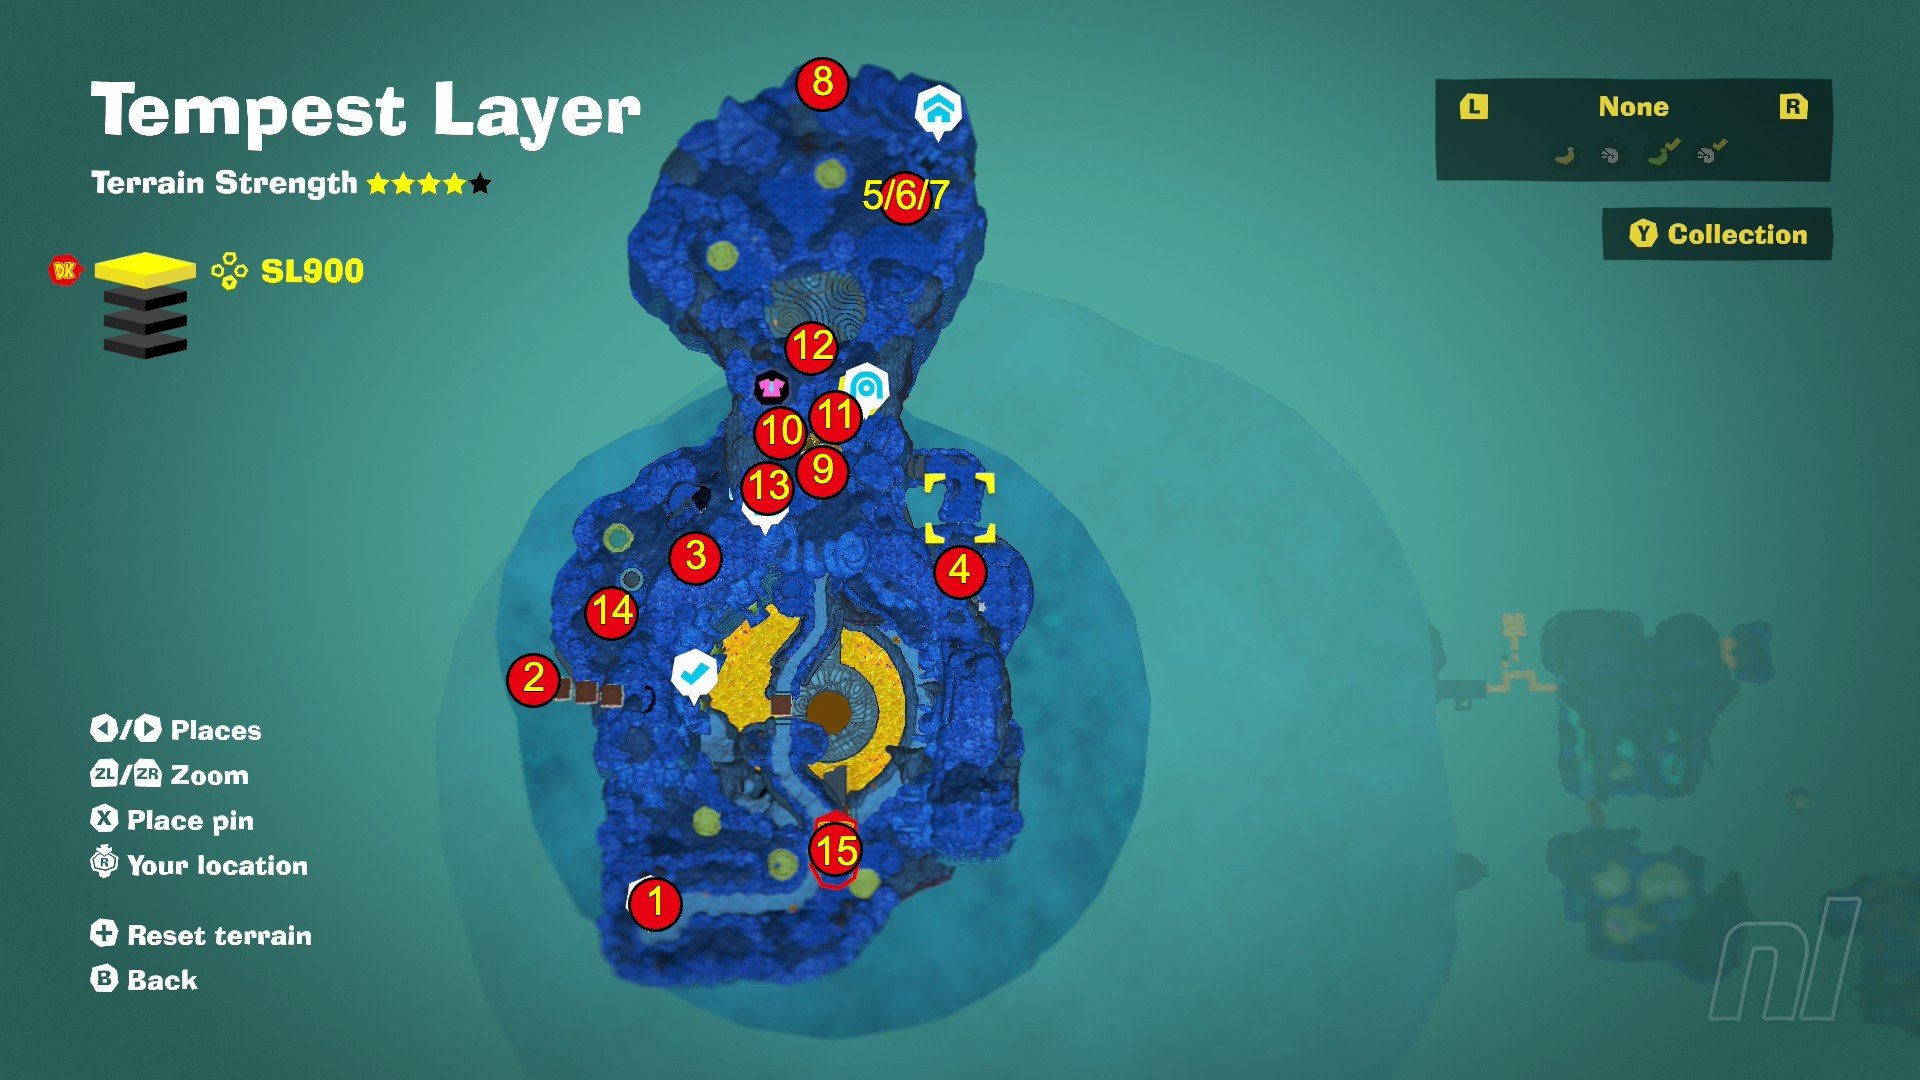
1. Stormed into the Tempest!
Drop down into the Tempest Layer.
2. Lifted to the Skies
On the Goo Gum platforms, hovering above the mountain left of the starting point. Lower the first three, then carry a chunk up with you to bring the last one down.
3. Tucked by the Tornado
In a small cave in the outside face of the left wall.
4. Hiding Up High
Exit the Elephant Elder’s Room to the right, and use the Burrowers’ Liftoff Ore to fly up to this ‘nana.
5. Rocketing over Lava
Enter the Liftoff Labyrinth Challenge Ruins, next to the Elephant Elder. Follow the main path to find this first ‘nana.
6. Lurking beyond Lava
In the lava ‘hurdle’ section, immediately after the first banana, use the last Liftoff Ore platform to get to a secret path in the top right, next to the lava on the ceiling. The banana is buried in sand, along this path.
7. Rocketing through Lava
Complete the Liftoff Labyrinth Challenge Ruins.
8. Elephant Elder’s Secret Snack
Tucked in the mountain, behind the Elephant Elder’s head.
9. The Tempest Growtone
Feed the Growtone 400 Gold.
10. The Hungry Tempest Growtone
Feed the Growtone 2,000 Gold.
11. The Sated Tempest Growtone
Feed the Growtone 4,000 Gold.
12. Rain-Soaked Roughhousing
Clear the three waves of enemies in the glass battle arena, over the Elephant Elder’s room.
13. Cavernous Corridors
Head into the caverns through the sand wall, straight ahead of the Lava Lake Walkway entrance to SL901. Turn left when you hit the first pillar, and use Hand Slap to track down this nearby banana.
14. Tour through the Tunnels
Head through the high-up sand wall, near the above banana, and follow the Fractones through the corridors.
15. The Secret Lava Pocket
Use Elephant Bananza to clear a mound of lava behind the Lava Lake entrance to SL901.
16-23.
Post-credit Banandium Gems (coming soon).
24. Tempest Chip Exchange
Cash in your chips at any Chip Exchange store in the layer.
SL901
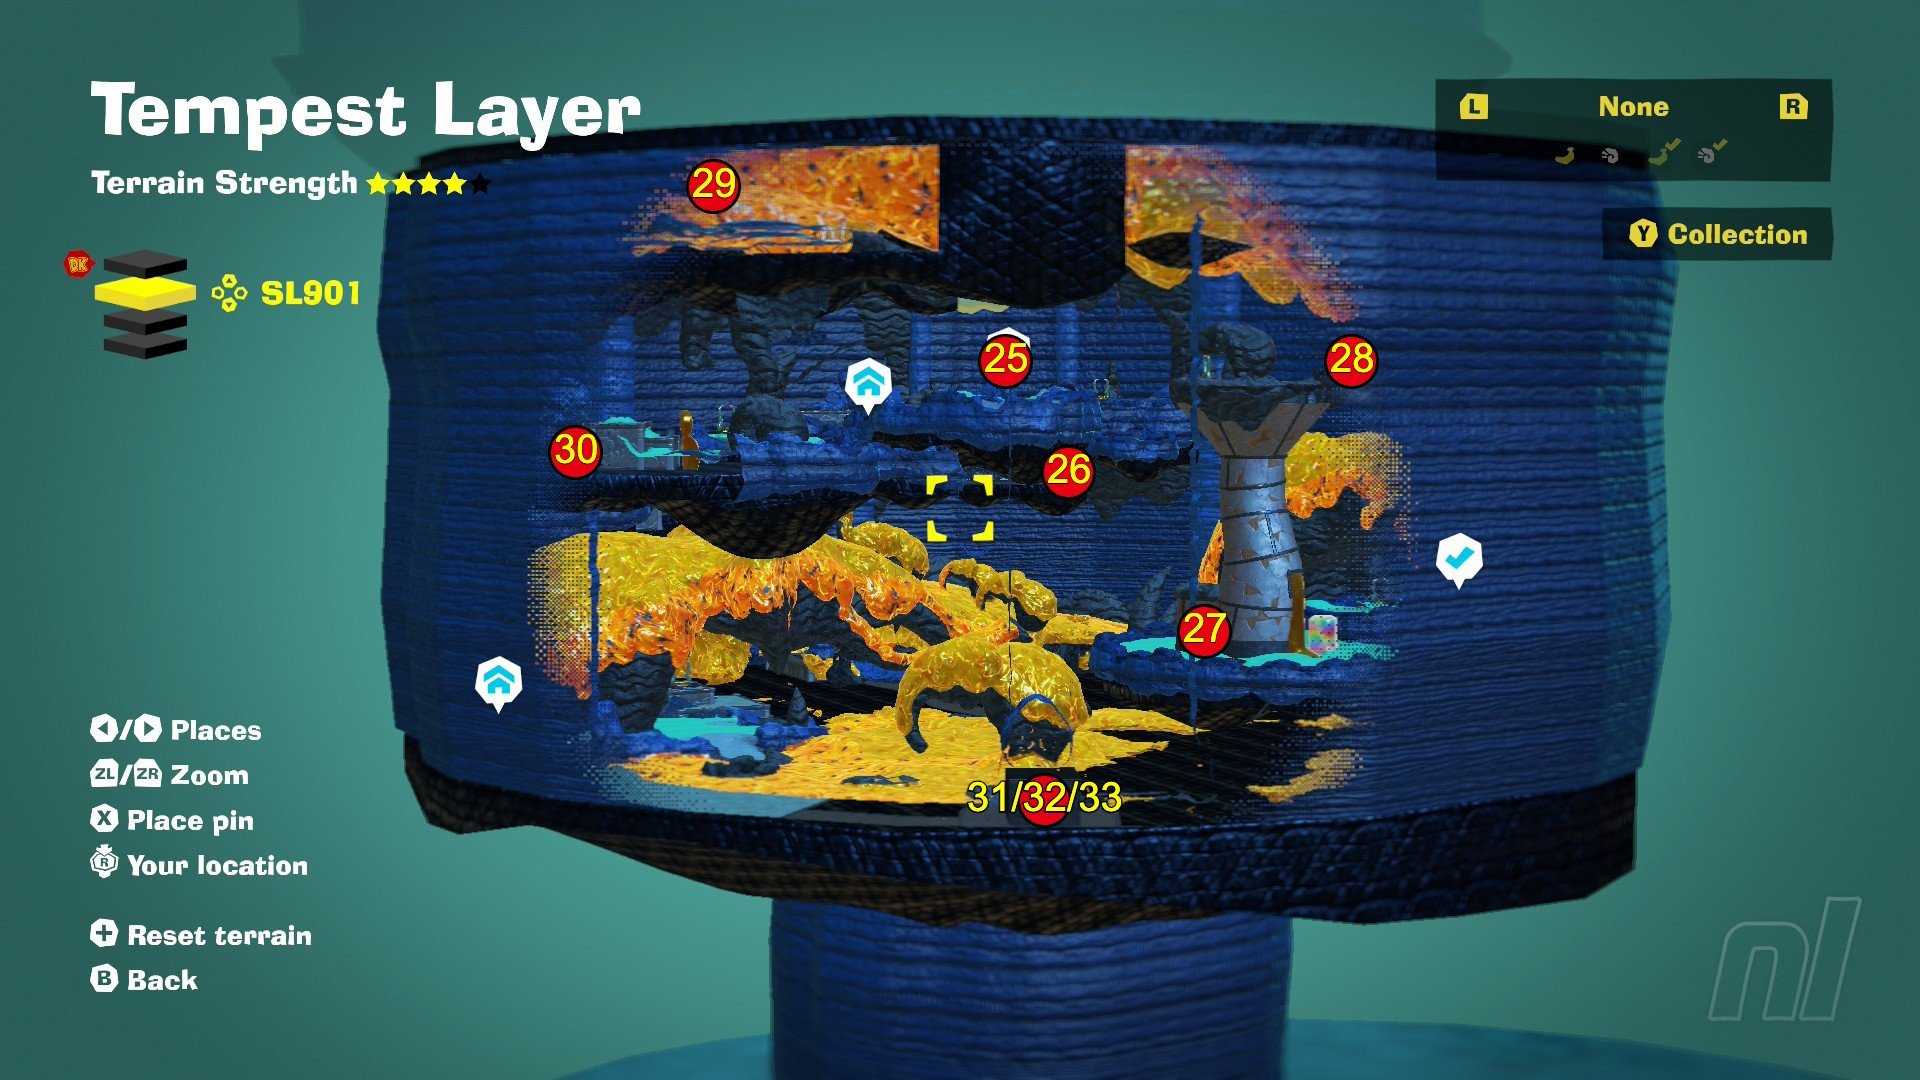
25. Beat Sinister Blusterwing!
Beat Sinister Blusterwing, then dive down to SL901.
26. Battle: Revolving-Ring Rumble
Dig down from the umbrella, right of the Lava Getaway, to access the Batteroid x3 Battle Ruins.
27. Unbothered by Burrowers
Clear the Void lock on the tower near the Ancient Record Crossroads and find this banana on the grass below.
28. Battle: Iron-Inferno Imbroglio
Use the Burrowers’ Liftoff Ore to fly to the top of the oil tower and access the Squeeloid x4 Battle Challenge.
29. Safe from Scalding Showers
Throw a chunk at the high-up zip-line, near the Squeeloid x4 Battle Ruins and ride it across the gap. Use Hand Slap on the platform to raise the zip-line back up, and you’ll find this banana above.
30. Lava Bath in the Hot Shower
With Elephant Bananza unlocked, follow the main path and start clearing the lava in the Hot-Shower Cave. This banana is next to a zip wire.
31. Piping-Hot Platforms
Follow the main path to the Hot-Showers’ key tornado. Keep clearing a straight path to the Elephant Bananza: Heating Up Challenge Ruins. The first banana is across the second set of platforms.
32. A Scalding Secret
Instead of heading to the Barrel Cannon, clear a path left and you’ll find this banana across two more rotating platforms.
33. Roasting while Rotating
Complete the Challenge Ruins.
SL902
This layer is absolutely packed with Banandium Gems, but the map camera doesn’t let you see inside the Jumbo Spa. We’ve therefore added two maps to this section: one that should give you a rough idea of where to look in the spa (from the outside), and one for the ensuing sky islands.
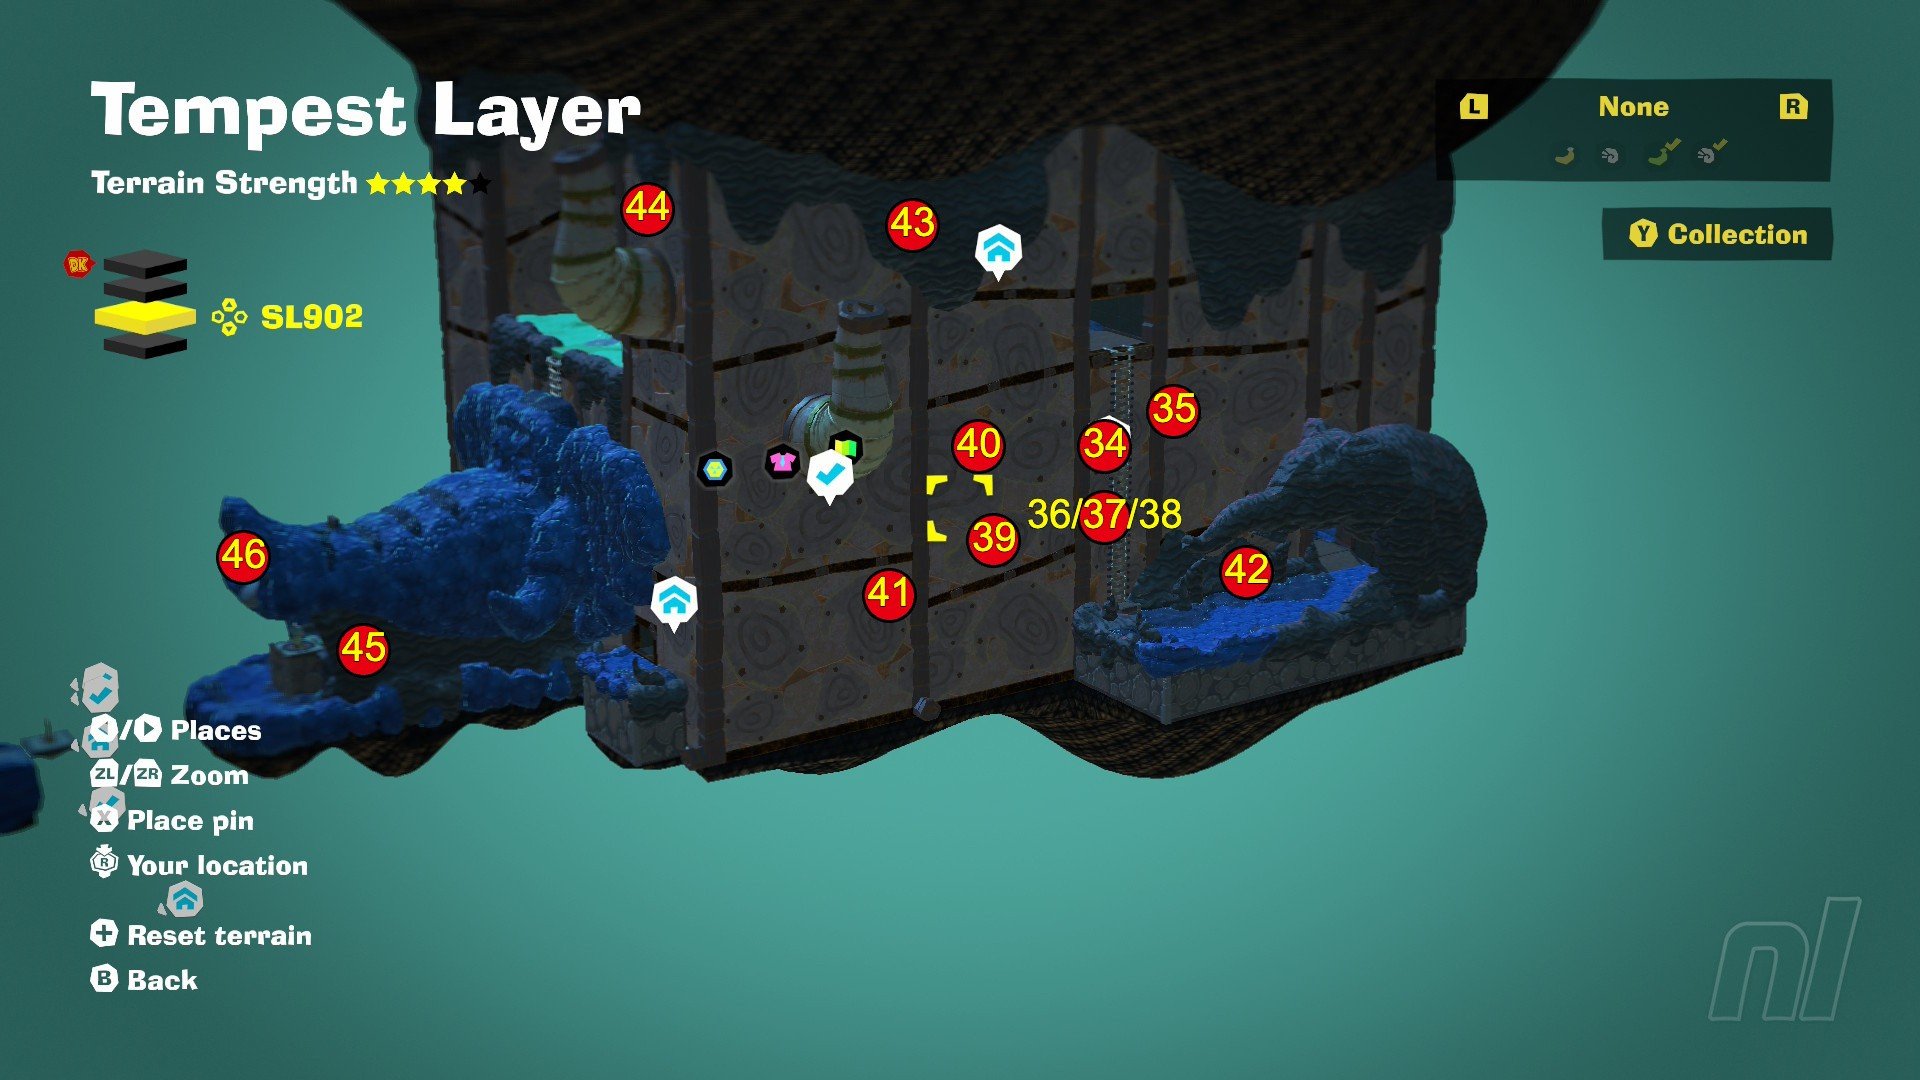
34. Beat Sinister Blusterwing! Again!
Defeat the boss for a second time, then dive down to SL902.
35. Taunting behind the Tap
Behind the Trunk-Dunk starting point. Use Elephant Bananza to clear the lava off the tap, then swim over to the banana.
36. A View of Zip-Line Valley
Drop off the left side of the layer’s starting point and speak to the Constructone to open the Zip-Line Valley Challenge Ruins. Grab a chunk at the start and climb up the pillar above the Challenge Course entrance. Use the secret zip line at the top to get this banana.
37. Zipping through the Valley
This banana is after the first zip-line sequence.
38. Zips, Hops, and Swaps
Complete the Challenge Ruins.
39. Tempest Smashin’ Stats
Smash through 70,000m of lava in the layer and speak to Smashintone in the Jumbo Spa.
40. Sitting above the Sauna
On the roof of the sauna.
41. Tempest Hide-and-Seek
Speak to Seekertone in the sauna, then find the four hidden Fractones around Jumbo Spa.
42. Cranky’s Tempest Rant
Leave the hot springs via the door on the left and speak to Cranky outside.
43. Shifty Smash: Scorching Sauna
Head up the ladder near Cranky Kong to the sauna. Complete the Shifty Smash Challenge using Elephant Bananza.
44. Taking in the Stormy Scenery
On top of the stone elephant’s head in which the spa is situated, you’ll find an oily tower. Rip up chunks of earth and stick them to the sides so you can climb up.
45. Battle: Elevator Encounter
Drop off the edge of the platform by the zip-line out of the spa and follow the rockface to the right. You’ll find the Antickoid x8 Battle Course tucked in a nook.
46. Stuck in the Elephant Snout
In the snout of the large stone elephant head, leaving Jumbo Spa.
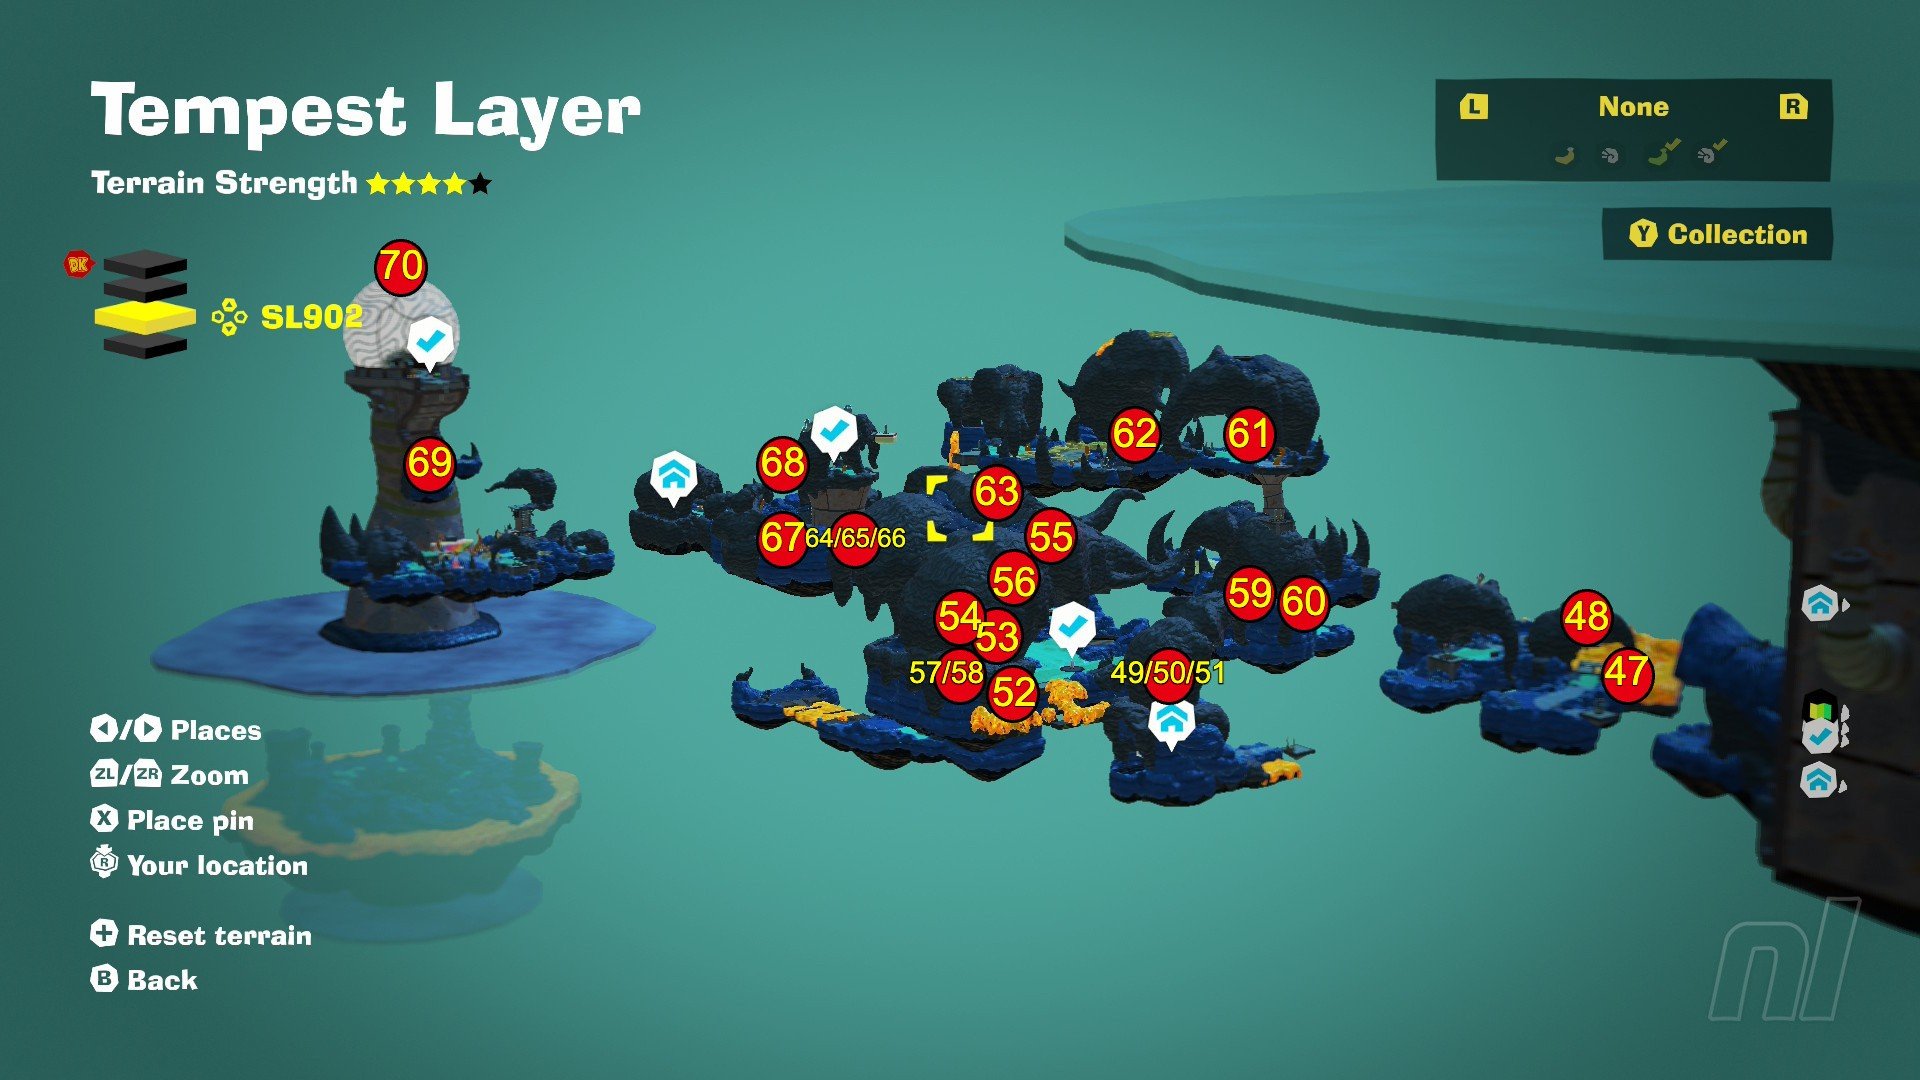
47. Inhaling Hot Lava
Inhale all the lava on the zip-wire path out of the spa. This banana is on the floor, between the pillars.
48. Shifty Smash: Stairs in the Storm
Complete the Shifty Smash Challenge on the stormy path out of the spa.
49. Crossing the Lava Road
Find the Hot-Lava Hotfoot Challenge Ruins above the Cliff-Edge Getaway. The first banana is at a rest spot, just after the Barrel Cannon.
50. Atop the Lava Road
Use one of Elephant Bananza’s chunks to Chunk Jump onto the raised platform, mid-challenge.
51. End of the Lava Road
Complete the Challenge Ruins.
52. Scorching, Shocking Scaffolds
Take the lava-covered route, left of the stormy main path.
53. Safe under Shelter
Complete the stormy path and find this banana in a wall next to the Big-Roof Shelter checkpoint.
54. Banana in the Mud Bath
Punch down, around the mud bath to find this banana buried in a pile beneath.
55. Among the Rocky Elephants
Use the Barrel Cannon north of Big-Roof and speak to the Fractone under the umbrella. Follow the map marker they give you to find this banana.
56. Battle: Ground-Gulping Glory
Complete the Crockoid x3 Battle Course, straight ahead from the Big-Roof checkpoint.
57. Tempest Fragmentone Recovery
Drop to the lower section of the Big-Roof island and return one of Fragmentone’s fragments from across the lava.
58. Tempest Fragmentone Restoration
Bring the other two Fragmentone fragments across the lava path.
59. Secret by the Shelter
Hop over the two goo platforms, right of the Big-Roof checkpoint, and you’ll find this banana through a breakable doorway.
60. Battle: Strike like Lightning
Complete the Rolluskoid x5 Battle Ruins on a lower section of the island next to Big-Roof Shelter.
61. Halfway to the Station
Use the Gloo Gum platforms near the Big-Roof checkpoint to get to the station path. Unearth some Liftoff Ore beneath the enemies in the mud, and fly up the tower to find this banana.
62. Battle: Zip-Line Zones
Speak to the Constructone, just along the path from the above banana, to open the Crockoid x2 Battle Course.
63. Concealed in the Sky
Speak to the Constructone on top of one of the stone elephant covers to build a zip line. Hop off the track halfway to land on a platform with a buried banana.
64. Slip by the Snipers
Head into the Sharpshooter Scramble Challenge Ruins in the structure below the Clifftop Shelter. The first banana is at a rest stop between challenges.
65. Sniper-Free Safe Spot
Instead of following the main climb towards the course’s finish line, move right with the moving platforms to find this banana on an extra route.
66. Scramble through the Snipers
Complete the Challenge Course.
67. Sunk in the Pool
Hidden in the water below the Clifftop Shelter checkpoint.
68. Shifty Smash: Stormy Skies
Complete the Shifty Smash Challenge on the last island before the station.
69. In a Floating Puddle
Clear the Void lock from the station island, then climb to the top of the stone elephant, where you found the lock. Use Ostrich Bananza to fly over to a nearby platform and you’ll find the banana in a puddle.
70. Atop Stormy Station
Use Liftoff Ore to reach the top of the station’s roof.
Post-Credit Banandium Gems
Don’t worry, we haven’t forgotten about these! We’ll be adding the Tempest Layer’s post-credit Banandium Gems soon enough.
Phew, another big one in the books! To track down the Gems in other layers, be sure to check out our Banandium Gem Locations guide hub, and we’ve got other hints, tips, and lists in our complete Donkey Kong Bananza Walkthrough guide.
Source link


